Showing posts with label ADF. Show all posts

Friday, 3 June 2016

Dependent LOV's on required fields in ADF

Very often it happened to implement dependent LOV's on required attributes in ADF. In this post i will show you how we can implements such use case. Implementing  dependent on non required attributes is quite easy.
Lets take Employees table from HR schema and create ADF BC on employees table. Am using jdev 12.2.1.

Step1. Create dependent LOV's on DepartmentId and LastName attribute and add the partial trigger on last name and auto submit = true on DepartmentId and run the page. Try to change the departmentId value from list and then the problem comes 


Issue: In some departments there is no employees Example 170 - Manufacturing then you will see some required validation message.


To fix such issues follow the below steps 

Step2: Create valueChange event on department id and place the below code 


Run the page.


Cheers :) Happy Learning :)


Wednesday, 24 June 2015

Access client machine printer using PrinterJob in Oracle ADF

Hi Folks this post is about accessing client machine printer using java PrinterJob in ADF application. Sometimes we may get requirement to handle windows printer like "Direct printing without print dialog box". You cannot customize the windows printer.
By using the Java PrinterJob you can completely handle print dialog and its properties from java. For more information on java PritnerJob check this
This can be achieved using Applet integration in ADF page.  For applet integration in ADF page go through my previous post Get Client machine MAC address in ADF using applet

Follow same steps given in my previous post.
In Messageapplet class add the following java code


Build the jar file and integrate in adf  project. Below is java script call the applet method on button click.


Run the jspx page. Print dialog is of java not windows print dialog.


Download here
Cheers :) Happy Learning :)


Monday, 22 June 2015

Get Client machine MAC address in ADF using applet

Hi folks in this post i will show you how to get client machine MAC address in ADF page using applet.
Step1: Create Generic application. and create java class which extends JApplet.

Step2:  Add the below shown java code. This code use to read the client machine MAC address.


Step 3: Create JAR file for this project and sign the jar file. This link will hep you to sign the jar

Step 4: Create Fusion Web application and add the jar file in public_html folder as shown below


Step 5: Now create jspx page with one button. When you click on button the MAC address displays in POP up. Using javascript will call the applet code and get the mac address.


Step6: Run the jspx page and click on get client mac address button


You can download the code using the link Download

Thanks:) Happy learning:)


Thursday, 12 February 2015

Insert new row at end of ADF table

Hi All, In today's post i will explain you how to insert new row at the end of table. By default when we click on CreateInsert button it creates a new row at first index of table. But some times we may get requirement to create row at last index of table.

Default CreateInsert at first index in ADF table


Now to add the row at last index as shown below.

We need to override the insertRow(Row row) method of ViewObjectImpl class.


Now run the jspx page and click on CreateInsert button. It creates the row at last index.

Thanks :) Happy Learning :)

Thursday, 6 November 2014

Disable Past dates and future dates in ADF Input Date

Hi all, In today's post i am going to explain you how to disable past date and future date for Input Date component. Sometime you get requiment to disable the past dates and future date also. This post can help you.

My requirement is to show only today and tomorrow's date and rest all need to disable. User should not select othere then these dates.
There are two attributes in inputDate component MinValue and MaxValue.

1. MinValue attribute is used to disable the back dates.

2. MaxValue attribute is used to disable the forward dates.

I have create one bean and two methods as show below

  private Date minDate = new Date();

    public Date getMaxDateVal() {
        Calendar cal = Calendar.getInstance();
        cal.setTime(new Date());
        cal.add(Calendar.DATE, 1); 
        return cal.getTime();

    }

cal.add(Calendar.DATE, 1);  // how many forwarding dates need to enable, In my requirement i should show tomorrow date, sho i have mentioned "1".


    public Date getMinDate() {
    try {
                Calendar cal = Calendar.getInstance();
    java.util.Date date = cal.getTime();
    DateFormat formatter = new SimpleDateFormat("yyyy-MM-dd");
                String currentDate = formatter.format(date);
    minDate = formatter.parse(currentDate);
  
    return formatter.parse(currentDate);
            } catch (Exception e) {
    return null;
            }
        }


jspx page code is  below.

 <af:inputDate label="Label 1" id="id1"
                      binding="#{viewScope.DateBean.testdate}"
                      maxValue="#{viewScope.DateBean.maxDateVal}"
                      minValue="#{viewScope.DateBean.minDate}"/>

 Run the page.


Thanks :)  Happy Learning :)


Wednesday, 24 September 2014

Consume Secured web service using proxy client in ADF

In last post i have discussed about how to expose Business component as Secured service ADF BC as secured service.It is very common requirement to consume secured web service in ADF applications.In this post i am going to cover the same use case. Now i am going to consume the same service URL as Web Service proxy client in ADF.

Create fusion web application

Right click on model and go to the web service and select Web Service Proxy.


provide the web service URL


 Click on next and select the oracle/wss_username_token_client_policy


Finally Click on next and finish.

This will generate client java class to test the service method. Provide the credentials to service as shown below.

Thanks :) Happy Learning :)

Tuesday, 23 September 2014

Expose ADF BC as secured web service

Hello everybody, Today in this post i am going to explain you how to expose ADF Business components as Secured web service (Authentication and authorization).
Create fusion web application and create business components for Employee Table i.e, Entity Object, View Object and Application module.


Next create view criteria based on departmentid as shown below


Now go to application module and create service interface and make sure you select the view criteria as shown below


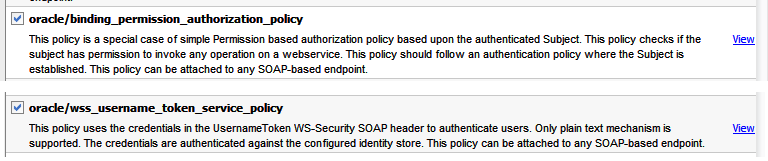
Next we need to add OWSM policies.

1. oracle/wss_username_token_service_policy (For authentication)
2. oracle/binding_permission_authorization_policy (For authorization)


Open the ApplicationModuleServiceImple.java select "AppModuleServiceImpl" from the structure window and go to property inspector and add the security policies on security attribute.


add the below given security policies.


Now enable security on adf application, Authentication and authorization. In jazn-data.xml, Create user and application role "Managers" and assign the resource to the manager as shown below


You can manually add in jazn-data.xml file as given below
  <jazn-realm default="jazn.com">
    <realm>
      <name>jazn.com</name>
      <users>
        <user>
          <name>user12</name>
          <display-name>user12</display-name>
          <credentials>{903}eQYtnsldQBALw0emi+VoIMG/WFBrGG48</credentials>
        </user>
      </users>
    </realm>
  </jazn-realm>
  <policy-store>
    <applications>
      <application>
        <name>CustomerHistory</name>
        <app-roles>
          <app-role>
            <name>managers</name>
            <class>oracle.security.jps.service.policystore.ApplicationRole</class>
            <members>
              <member>
                <name>user12</name>
                <class>oracle.security.jps.internal.core.principals.JpsXmlUserImpl</class>
              </member>
            </members>
          </app-role>
        </app-roles>
        <resource-types>
          <resource-type>
            <name>WSFunctionPermissionabc</name>
            <display-name>WSFunctionPermissionaa</display-name>
            <matcher-class>oracle.wsm.security.WSFunctionPermissionaaa</matcher-class>
            <actions-delimiter>,</actions-delimiter>
            <actions>invokeaa</actions>
          </resource-type>
        </resource-types>
        <jazn-policy>
          <grant>
            <grantee>
              <principals>
                <principal>
                  <name>managers</name>
                  <class>oracle.security.jps.service.policystore.ApplicationRole</class>
                </principal>
              </principals>
            </grantee>
            <permissions>
              <permission>
                <class>oracle.wsm.security.WSFunctionPermission</class>
                <name>/model/common/AppModuleService#findEmployeesView1EmployeesViewCriteria</name>
                <actions>invoke</actions>
              </permission>
            </permissions>
          </grant>
        </jazn-policy>
      </application>
    </applications>
  </policy-store>
</jazn-data>


Only users whose role is managers can access the view Criteria method. For other users it throws authorization exception.
Deploy and then test the service in Webservice tester.

Thanks :) Happy Learning :)  NK


Friday, 22 August 2014

Custom Login in ADF Application

We have used ADF security many more time with form based Authentication and Authorization using default login.html and error.html.
Suppose if we want to design our own login.jspx page and have complete control on ADF authentication then follow these steps.

1. Create Login.jspx and update the web.xml with login.jspx.

2. In login.jspx  add two input text with name (User name and password) and one button create managed bean  and  bind the input text with managed bean use the below code on button action event.

3. Add the following 3 jars in view controller project library

/MIDDLEWARE_HOME/modulescom.bea.core.weblogic.security.auth_xxxx.jar, /MIDDLEWARE_HOME/modulescom.bea.core.weblogic.security.identity_xxxxx.jar, /WLSERVER/serverlibwls-api.zip


import javax.faces.application.FacesMessage;
import javax.faces.context.FacesContext;
import javax.faces.event.ActionEvent;

import javax.security.auth.Subject;
import javax.security.auth.login.FailedLoginException;
import javax.security.auth.login.LoginException;
import javax.servlet.RequestDispatcher;
import javax.servlet.http.HttpServletRequest;
import javax.servlet.http.HttpServletResponse;

import oracle.adf.view.rich.component.rich.input.RichInputText;

import weblogic.security.URLCallbackHandler;
import weblogic.security.services.Authentication;
import weblogic.servlet.security.ServletAuthentication;


    public void executeLogin(ActionEvent actionEvent) {
        FacesContext ctx = FacesContext.getCurrentInstance();
        HttpServletRequest request =
            (HttpServletRequest)ctx.getExternalContext().getRequest();
        Subject mySubject;
        try {
            mySubject = Authentication.login(new URLCallbackHandler(uid.getValue().toString(), pwd.getValue().toString()));
            ServletAuthentication.runAs(mySubject, request);
            ServletAuthentication.generateNewSessionID(request);
            String loginUrl =
                "/adfAuthentication?success_url=/faces/main.jspx";
            HttpServletResponse response =
                (HttpServletResponse)ctx.getExternalContext().getResponse();
            RequestDispatcher dispatcher =
                request.getRequestDispatcher(loginUrl);
            dispatcher.forward(request, response);
        } catch (FailedLoginException e) {
            FacesMessage msg =
                new FacesMessage(FacesMessage.SEVERITY_ERROR, "Invalid username or password",
                                 "Invalid username or password");
            ctx.addMessage(null, msg);
        } catch (Exception e) {
            System.err.println(e.getMessage());
        }
       
    }

Happy Learning :)

Thursday, 27 September 2012

Creating role,user and grant role to user using OPSS


        JpsContextFactory ctxf = JpsContextFactory.getContextFactory();
        JpsContext ctx = ctxf.getContext();
        IdentityStoreService storeService = ctx.getServiceInstance(IdentityStoreService.class);
        IdentityStore idStore = storeService.getIdmStore();
        RoleManager rm=idStore.getRoleManager();
        rm.createRole("sampleRole");
        UserManager um=idStore.getUserManager();
        // creating user
       um.createUser("username", "password".toCharArray());

       //grant role to user

            if( um.isCreateUserSupported()){
             
            User u=idStore.searchUser(IdentityStore.SEARCH_BY_NAME,"username");
                                   
            Role role =idStore.searchRole(IdentityStore.SEARCH_BY_NAME,"sampleRole");
                 
            idStore.getRoleManager().grantRole(role,u.getPrincipal());
         
           }
       

Oracle ADF 11g interview questions


 Q : What are various components in ADF?
A : Oracle ADF has following components

·         ADF Business Components(Model)
·         ADF Faces (View)
·         ADF Taskflows(Controller)
Q : What is Oracle ADF?
A : Oracle ADF is an commercial java/j2ee framework, which is used to build enterprise applications.
It is one of the most comprehensive and advanced framework in market for J2EE

Q : What are the advantages of using ADF?
A : Following are the advantages of using :

·         It supports Rapid Application Development.
·         It is based on MVC architecture
·         Declarative Approach (XML Driven)
·         Secure
·         Reduces maintenance cost and time
·         SOA Enabled
Q : What is the return type of Service Methods?
A : Service Methods can return Scalar or Primitive Data types.

Q : Can Service Methods return type Void?
A : Yes, Service Methods can Return type Void

Q : Can Service Methods return Complex Data types?
A : No, service methods can return only primitive/scalar data types.

Q : Which component in ADF BC manages transaction ?
A : Application Module, manages transaction.

Q : Can an entity object be based on two Database Objects(tables/views) or two Webservices ?
A : No entity objects will always have one to one relationship with a database object or web service.

Q : Where is that we write business rules/validations in ADF and why?
A : We should be writing validations at Entity Object level, because they provide highest degree of reuse.

Q : What is Managed Bean?
A : Managed bean is a java class, which is initialized by JSF framework. It is primarily used to hold view and controller logic. It is also used to execute java code to be executed on a user action like Button Click.

Q : What are Backing Bean?
A : Backing beans are those managed beans which have 1:1 mapping with a page. They have getters and setters
for all the components in the related page.

Q : What is a Taskflow?
A : Taskflow is the controller of an ADF application, it provides us an declarative approach to define the control flow.  It is used to define the navigation between pages and various taskflow activites.

Q : What are the different types/categories of Taskflows ?
A :  Taskflows are of two categories : Bounded and UnBounded.

Q : What is the difference between Bounded and UnBounded taskflows?
A : Differences between Bounded and UnBounded taskflows :

·         Bounded taskflows can be secured but Unbounded can’t.
·         Bounded taskflows can accept parameter and return values but unbounded taskflows don’t support parameters
·         Bounded taskflows has a single entry point or a default activity but unbounded taskflows have multiple entry points.
·         Bounded taskflows can be called from other bounded/unbounded taskflows but unbounded cannot be called or reused.
·         Bounded taskflows support transactions unbounded don’t

Q : What are the various access scopes supported by ADF?
A : ADF Faces supports the following scopes

·         Application Scope
·         Session Scope
·         PageFlow Scope
·         Request Scope
·         BackingBean Scope.
Q: What is databindings.cpx file in ADF?
A:
In ADF web application as soon as you drop a databound component on your page a DataBindigs.cpx file gets created. You may wonder what it contains? So, here it is:

The DataBindings.cpx keeps track of the individual page definitions files used within the project, as well as the DataControls mapping to such things as ADF Business Components Application Modules.

Till Jdeveloper 10.1.3 release there was no way to have multiple DataBindings.cpx files which was very much desirable as the project the size grows and being worked by multiple teams. Jdeveloper 11g added this capability to have multiple DataBindings.cpx files.

There is a new file in 11g called adfm.xml which is used to keep track of all such DataBindings.cpx files in the system. So, when breaking your DataBindings.cpx you need to take care to create an entry in the adfm.xml. You also need to make sure to have unique application id attribute value for each entry.
Q: How to Skip Validation?
A: At view layer Keep immediate=true

Q : Describe life cycle of a ADF Page?
A : ADF page is an extension of JSF and has following phases in its lifecycle

1.       Initialize Context: In this phase the adf page initializes the LifecycleContext with information that will be used during the Lifecycle.
2.       Prepare Model:  In this phase ui model is prepared and initialized. In this phase page parameters are set and methods in the executable section of the page definition of the ADF page are executed.
3.       Apply Input Values: This phase handles the request parameters. The values from the HTML are sent to the server  and applied to the page binding in page definitions.
4.       Validate Input Values:  This phase validates the values that were built in the Apply input values phase
5.       Update Model:  Validated values supplied from user are sent to ADF business components data model
6.       Validate Model Updates:  In this phase the business components will validate user supplied values.
7.       Invoke Application:  This phase will process the ui events stack built during the life cycle of page and also fire navigational events
8.       Prepare Render:  This is the final phase where HTML code is generated from the view tree.

Q: What is Association and Viewlink ?
A: They define the join or the link among EO’s and VO’s.Association defines link between EO’s.They can be considered as PrimaryKey/ForeignKey relationship between tables.
The Viewlink is for a VO.It defines the Join conditions.A viewlink can be based on an association or based on attributes,Basing viewlinks on associations have the same advantage of entity cache and few more which are unveiled later.


Wednesday, 26 September 2012

Get Application Module object in Managed bean


FacesContext context = FacesContext.getCurrentInstance();

BindingContext bindingContext = BindingContext.getCurrent();

//open the dataBindings.cpx file and check for application module name inside data control usages

DCDataControl dc  = bindingContext.findDataControl("name_of_application_module in dataBindings.cpx");

AppModuleImpl appM = (AppModuleImpl)dc.getDataProvider();

Tuesday, 11 September 2012

Oracle ADF 11g Creating Dependent LOV's

Create new Fusion web application

1. create entity object on Employee table.

2. Select only EmployeeId and DepartmentId attributes because we are creating dependent LOV on this two attributes.

3.Select View Object check box or create new view object with Employee entity.

4.Select Application Module check box or create new Application module and assign employee view object to it as shown below.


5. Create View Accessors on EmployeeId and DepartmentId. Click on View Accessors tab and add new shuttle the EmployeeVO and rename it to "EmpidVA"  as shown in below figure.


6. Similarly create view accessors on DepartmentID with name "DeptIdVA"

 7. In Employee View Object click on Attributes tab, select EmployeeId attribute click on list of values and select the options as shown in following images.


8. Select list attribute as EmployeeId


9. click on UI hints tab and shuttle the EmployeeId


10. Similarly create the list of values for DepartmentId Attribute.

11.Click on the Query Tab and create new view criteria


12. click on Add Item and select bind variable


13. Click on add symbol in parameter option, give the variable name as "bDeptId" and select data type as Integer click on ok.

14. Now go to the view Accessors and select "EmpVA" and click on edit symbol. Shuttle employee criteria and bind the parameters as shown below.


15. Run the application module and test the business component.


You can download the application. Dependentlov